Introduction: The Dreamiest, Crispiest, Most Delightful Pavlova!
Oh WOW, my friend, if you haven’t had a homemade Pavlova before, you are in for a TREAT!! This dreamy dessert is light as a cloud, with a crisp, crackly shell and a marshmallowy center that just melts in your mouth. Top it with pillowy whipped cream and fresh fruit, and you’ve got yourself a showstopper that screams elegance with zero effort!
Pavlova is one of those magical desserts—perfect for summer barbecues, Christmas feasts, or even a Tuesday night when you just need something special. And the best part? It’s naturally gluten-free! So, if you’re entertaining guests with dietary restrictions, this beauty’s got your back.
I still remember the first time I made Pavlova—let’s just say my oven and I had a little disagreement. It cracked, it sank, but you know what? It was still DELICIOUS. And that’s the thing—Pavlova is forgiving, and with a few tips and tricks (which I’m spilling ALL over this post), you’ll nail it every time.
So, let’s get cracking (pun totally intended) and make the best Pavlova of your life!
Why You’ll Love This Pavlova Recipe
Trust me, once you try this, you’ll be hooked for life. Here’s why:
- Beginner-Friendly – Yes, it’s fancy, but it’s actually super simple!
- Perfect for Any Occasion – Birthdays, holidays, summer parties, or just because.
- Crispy Outside, Fluffy Inside – The ultimate texture contrast!
- Customizable – Go wild with toppings—berries, chocolate, caramel, you name it.
- Make-Ahead Friendly – Prep it in advance and assemble when ready.
What Makes a Perfect Pavlova?
Ahh, the science behind Pavlova is pure magic. But let’s break it down:
The Key Features of a Perfect Pavlova
- A crisp, shatteringly light shell – No chewy or weepy meringue here!
- A soft, marshmallowy center – That perfect, melt-in-your-mouth texture.
- Just the right amount of sweetness – So it pairs beautifully with tangy fruit.
- Stable enough to hold toppings – Because no one likes a collapsing dessert.
When done right, Pavlova is a masterpiece, both in taste and presentation. But before we jump into the recipe, let’s talk history and culture!
The History & Cultural Significance of Pavlova
Pavlova is more than just a dessert—it’s a symbol of celebration, elegance, and culinary rivalry! For decades, Australia and New Zealand have battled over its true origins, both claiming to have invented the dish in honor of the legendary Russian ballerina, Anna Pavlova. But who really created this ethereal masterpiece? Let’s dig into the delicious history.
A Dessert Fit for a Ballerina
Anna Pavlova was an internationally renowned ballerina in the early 20th century, captivating audiences across the globe with her graceful performances. In the 1920s, she toured Australia and New Zealand, and somewhere along the way, a chef was so inspired by her lightness and beauty that they decided to create a dessert to reflect it.
The result? A sweet, delicate dish with a crisp shell and an airy, cloud-like center—as elegant and weightless as Pavlova’s dance moves!
The Battle of Origins: Australia vs. New Zealand
The biggest debate surrounding Pavlova isn’t about how to make it—it’s about who made it first! New Zealand claims that the first Pavlova recipe was published in 1927 in a local cookbook. Australia, on the other hand, insists that it was their chefs who first whipped up the now-famous dessert.
Food historians have traced early versions of Pavlova-like desserts back to both countries, but the true origins remain a mystery. Regardless of where it was born, one thing is for sure—Pavlova is a beloved dessert enjoyed worldwide!
Pavlova’s Place in Modern Culture
Today, Pavlova is a staple in Australian and New Zealand celebrations, especially during the holidays and summer months. It graces tables at Christmas feasts, BBQ gatherings, and birthdays, often topped with fresh, vibrant fruits.
Beyond its home turf, Pavlova has gained international recognition. In many parts of the world, it’s considered a luxurious yet effortless dessert, perfect for entertaining. It has also evolved over time, with new flavors and variations emerging in different cultures.
No matter where or how you serve it, Pavlova represents joy, indulgence, and a touch of elegance.
Ingredients for Pavlova Perfection
Let’s keep it simple—only a handful of ingredients, but each one plays a crucial role.
Meringue Base
- Egg whites – The backbone of the Pavlova! Room temp, always.
- Caster sugar – Dissolves beautifully, giving a smooth texture.
- Cornflour – Helps create that marshmallowy center.
- White vinegar – Adds structure and prevents collapse.
Whipped Cream Topping
- Heavy cream – Whipped to soft, dreamy peaks.
- Vanilla extract – Because a touch of vanilla makes everything better.
- Powdered sugar – Just a bit to sweeten things up.
Toppings (Go Wild!)
- Fresh berries, passionfruit, kiwi, mango—anything goes!
- Chocolate shavings or a drizzle of caramel sauce.
- Crushed pistachios for a crunchy twist.
Step-by-Step Guide to Making Pavlova
Pavlova might look like an elegant, delicate dessert, but guess what? It’s easier than you think! With a few simple ingredients and a little patience, you can create a light, crisp meringue with a soft, marshmallowy center that will impress anyone who takes a bite.
That said, precision is key when making Pavlova. Small details—like how long you whip the egg whites or how slowly you cool it down—can make or break your final result. But don’t worry, I’ve got your back! Follow these step-by-step instructions, and you’ll have a flawless Pavlova that’s crisp on the outside, soft on the inside, and topped with creamy goodness.
Step 1: Preparing Your Baking Sheet and Oven
Alright, time to prep your baking space! Preheat your oven to 115°C (240°F) and line a baking sheet with parchment paper. You can draw a circle (about 8 inches) on the parchment paper as a guide, then flip the paper over so the pencil side doesn’t touch the food.
Step 2: Separating and Whipping the Egg Whites
Now for the most important part—whipping the egg whites! If you mess up here, your Pavlova might collapse or turn grainy.
How to Separate Egg Whites Correctly
- Crack the egg and separate the white from the yolk one at a time into a small bowl.
- If the yolk stays intact, transfer the white to a large mixing bowl.
- If even a tiny speck of yolk gets in, start over! Fat from the yolk prevents proper whipping.
Whipping to Soft Peaks
- Start beating the egg whites on low speed until they look foamy.
- Increase to medium speed and continue beating until soft peaks form—this means the mixture holds its shape but still flops over.
Step 3: Adding Sugar Gradually
Dumping sugar all at once? Big mistake! Instead, add it one tablespoon at a time while continuing to beat the egg whites.
Signs That You’re Doing It Right
The meringue turns glossy and thick.
Stiff peaks form (meaning it holds its shape and doesn’t droop).
When you rub a little meringue between your fingers, it should feel smooth (if it’s grainy, the sugar hasn’t dissolved yet—keep beating!).
This step takes time—around 7–10 minutes of beating—but don’t rush it. Sugar that’s not fully dissolved can cause weeping later!
Step 4: Adding Cornstarch and Vinegar
Once your meringue is stiff and glossy, gently fold in the cornstarch and vinegar with a spatula. This helps create that soft, marshmallowy interior.
Don’t stir vigorously—just fold gently so you don’t knock the air out!
Step 5: Shaping the Pavlova
Now comes the fun part—creating that perfect Pavlova shape!
- Spoon the meringue onto the prepared baking sheet in a large mound.
- Use a spatula to shape it into a round, slightly domed disk.
- Make a shallow well in the center (this holds the toppings later).
- Smooth the sides gently, or leave them swirly for a rustic look.
Step 6: Baking the Pavlova
Finally, it’s time to bake! Place your Pavlova in the low-temperature oven and bake for about 1.5 hours.
Don’t open the oven door while baking! Sudden temperature changes can make the Pavlova crack or collapse.
Step 7: Cooling the Pavlova Slowly
This step is crucial! Once the baking time is up, turn off the oven and leave the Pavlova inside to cool completely.
Cooling too fast can cause cracks. Leaving it in the oven allows it to dry out gradually, keeping the texture just right.
Ideally, let it cool for at least 4 hours, or even overnight.
Step 8: Whipping the Cream and Preparing Toppings
While your Pavlova is cooling, whip up the cream and prepare the toppings!
- Beat heavy whipping cream with a bit of powdered sugar and vanilla until soft peaks form.
- Slice fruits like strawberries, kiwis, mango, or passionfruit.
- If using sauces (caramel, lemon curd, or berry coulis), have them ready.
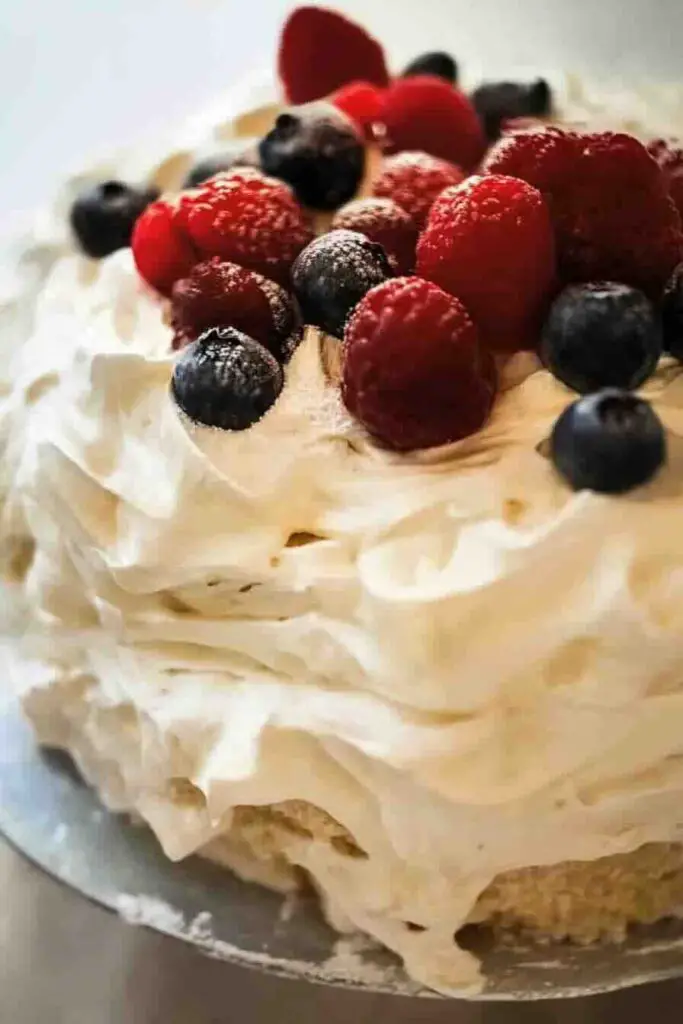
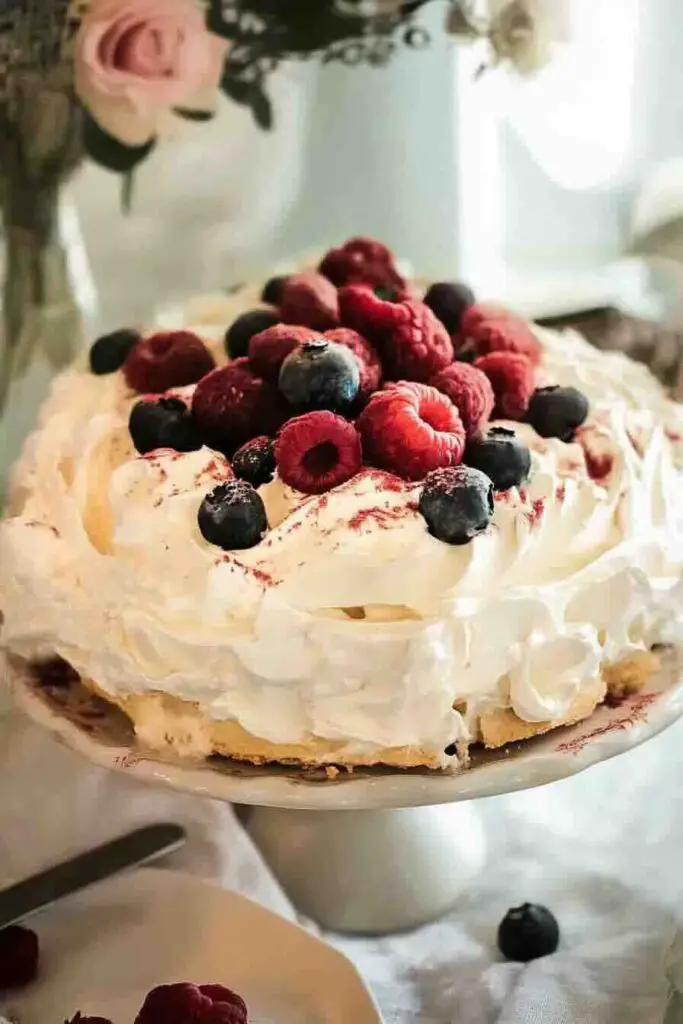
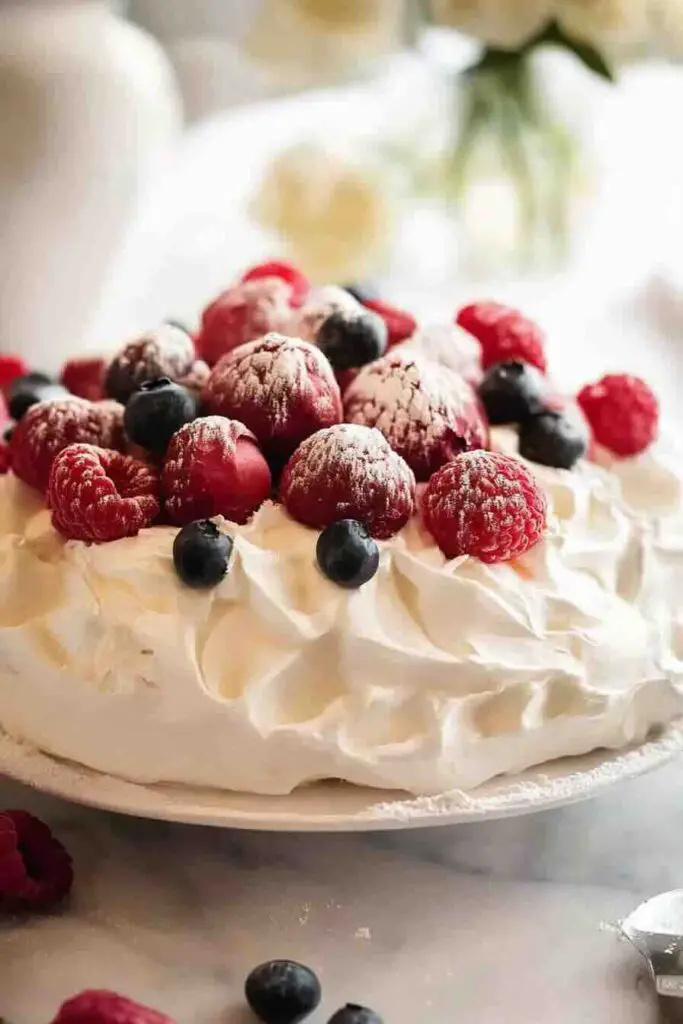
Step 9: Assembling and Serving the Pavlova
When your Pavlova is completely cool, it’s time for the grand finale!
- Spread the whipped cream gently over the top, keeping it slightly fluffy.
- Arrange fresh fruit on top—pile it high for a dramatic look!
- Drizzle with any sauces or garnishes.
Serve immediately, and get ready for oohs and aahs from everyone at the table!
Variations & Toppings: Taking Pavlova to the Next Level
One of the best things about Pavlova is that it’s highly customizable! While the classic version features whipped cream and fresh fruit, you can get wildly creative with flavors, textures, and toppings. Whether you’re a chocolate lover, a citrus fan, or a nutty crunch enthusiast, there’s a Pavlova variation just for you!
Popular Flavor Twists
If you’re looking to spice things up, try one of these fun and delicious Pavlova variations:
- Chocolate Pavlova – Add cocoa powder to the meringue for a rich, chocolaty twist. Top with chocolate shavings, whipped cream, and berries.
- Berry Bliss Pavlova – Load up on fresh berries like strawberries, blueberries, and raspberries. A drizzle of berry coulis makes it even better!
- Citrus Pavlova – Zest up your Pavlova with lemon or lime. A spoonful of lemon curd on top is chef’s kiss!
- Nutty Delight Pavlova – Add a sprinkle of crushed pistachios, hazelnuts, or almonds for an extra crunch.
- Caramel Pavlova – Drizzle caramel sauce over the top and pair it with banana slices for a Banoffee-inspired treat.
The Best Fruit & Nut Pairings
Fruit and nuts add both color and texture to Pavlova, creating a perfect balance of sweet, tart, and crunchy. Here are some classic and unique combinations to try:
- Strawberries + almonds – The classic combo for a reason!
- Mango + passionfruit – A tropical dream!
- Banana + caramelized pecans – Sweet, nutty perfection.
- Cherries + dark chocolate – Think Black Forest vibes!
- Kiwifruit + macadamia nuts – A nod to Pavlova’s Kiwi roots.
Sweet Sauces & Drizzles
A drizzle of sauce can elevate your Pavlova to gourmet levels! Some go-to favorites include:
- Berry coulis – A tangy, vibrant addition that balances the sweetness.
- Caramel sauce – Rich and buttery, it’s a game-changer!
- Lemon curd – Zesty and refreshing, perfect for summer.
- Chocolate ganache – Because everything’s better with chocolate!
No matter how you top it, Pavlova is a blank canvas for creativity. Experiment, mix and match, and discover your personal favorite!
Nutritional Insights: A Sweet Treat with a Light Touch
Pavlova may be a dessert, but compared to cakes and pastries, it’s lighter and less indulgent than you might think. While it does contain sugar, it’s naturally low in fat and gluten-free, making it a dessert that can fit into many diets.
The Nutritional Breakdown
A single serving of Pavlova (without toppings) contains:
- Calories: ~150-200 kcal
- Carbohydrates: ~35g (mostly from sugar)
- Protein: ~2-3g (thanks to egg whites!)
- Fat: ~0g (the meringue itself has none, but toppings will add some)
Healthier Swaps
Want to make it a little healthier? Try these modifications:
- Use coconut sugar or a sugar substitute to reduce refined sugar content.
- Opt for Greek yogurt instead of whipped cream for a tangy, protein-packed topping.
- Pile on antioxidant-rich berries instead of sugary sauces.
Pavlova is already one of the lighter desserts out there, so enjoy it guilt-free!
Pro Tips & Tricks:
Making Pavlova isn’t hard, but there are a few tricks to ensure it turns out perfect every time.
Perfecting the Meringue
- Use room-temperature egg whites – They whip up better and create more volume.
- Add sugar gradually – Dumping it all in at once? Big mistake. Go slow!
- Beat until glossy, stiff peaks form – If it’s grainy, the sugar hasn’t dissolved.
Avoiding Common Mistakes
Cracks? No worries! It happens, and it still tastes amazing. Just cover it with cream.
Weeping meringue? Too much humidity in the air—try again on a dry day!
Collapsing center? It either cooled too fast or the oven was too hot.
Shaping for Stability
- Make a shallow well in the center – This holds toppings and prevents collapse.
- Keep it short and wide – Tall Pavlovas are more likely to crack.
Patience and precision will give you a Pavlova that’s as beautiful as it is delicious!
Storage & Health Tips
Pavlova is delicate, so storing it correctly is key to keeping that crisp shell intact!
How to Store It
- At room temperature – Unassembled Pavlova stays fresh in an airtight container for up to 2 days.
- Avoid the fridge – The moisture will ruin the crisp texture.
- Assemble just before serving – Once topped with cream, it should be eaten immediately!
FAQs: Your Pavlova Questions, Answered!
Q: Can I make Pavlova ahead of time?
A: Yes! Bake it the day before and store it in an airtight container.
Q: Why is my Pavlova sticky?
A: Humidity is the likely culprit. Try making it on a dry day.
Q: What’s the difference between Pavlova and meringue?
A: Meringue is crunchy all the way through, while Pavlova has a soft, marshmallowy center.
Q: Can I freeze Pavlova?
A: Technically, yes—but it loses texture. It’s best made fresh!
Before You Go…
Craving more goodness? Check out my recipe for Tiramisu next. It’s just as comforting, indulgent, and easy to make. You’re going to love it! ❤️
Print
Pavlova Recipe
- Prep Time: 20 minutes
- Cook Time: 1 hour 30 minutes
- Total Time: 1 hour 50 minutes
- Yield: 6–8 servings 1x
Description
This classic Pavlova recipe delivers the perfect balance of a crisp, delicate shell and a soft, marshmallow-like center. Topped with lightly sweetened whipped cream and fresh fruit, it’s an elegant yet simple dessert that’s perfect for any occasion. Whether you’re making it for a summer gathering or a festive holiday treat, this step-by-step guide ensures a flawless Pavlova every time!
Ingredients
For the Meringue Base:
- 4 large egg whites (room temperature)
- 1 cup (200g) caster sugar
- 1 tsp white vinegar
- 1 tsp cornstarch (cornflour)
- 1 tsp vanilla extract
For the Whipped Cream:
- 1 cup (240ml) heavy whipping cream
- 2 tbsp powdered sugar
- 1 tsp vanilla extract
Toppings (Choose Your Favorites):
- Fresh berries (strawberries, raspberries, blueberries, blackberries)
- Passionfruit pulp
- Sliced mango or kiwi
- Toasted nuts (almonds, pistachios)
- Chocolate shavings
- Caramel or berry sauce
Instructions
- Preheat & Prepare:
- Preheat your oven to 250°F (120°C).
- Line a baking sheet with parchment paper. If needed, draw an 8-inch circle as a guide.
- Whip the Egg Whites:
- Using a clean, dry bowl, beat the egg whites with an electric mixer until soft peaks form.
- Gradually add sugar, one tablespoon at a time, beating until glossy and stiff peaks form.
- Stabilize the Meringue:
- Gently fold in the cornstarch, vinegar, and vanilla extract using a spatula.
- Shape the Pavlova:
- Spoon the meringue onto the parchment paper, shaping it into a round, slightly domed shape with a shallow center.
- Bake & Cool:
- Place in the preheated oven and bake for 90 minutes.
- Turn off the oven and let the Pavlova cool completely inside with the door slightly ajar.
- Prepare the Whipped Cream:
- In a bowl, whip the heavy cream, powdered sugar, and vanilla until soft peaks form.
- Assemble & Serve:
- Once the Pavlova has fully cooled, top it with whipped cream and your choice of fresh fruit, nuts, or sauces.
- Enjoy!
- Slice and serve immediately for the best texture.
Notes
- Avoid making Pavlova on humid days—moisture can cause it to weep or become too soft.
- For best results, use superfine (caster) sugar as it dissolves more easily.
- Pavlova is best eaten fresh but can be stored in an airtight container for up to 2 days (without toppings).
- Do not refrigerate the meringue base, as it will absorb moisture and soften.
Nutrition
- Calories: 230
- Sugar: 32g
- Sodium: 30mg
- Fat: 9g
- Saturated Fat: 5g
- Carbohydrates: 34g
- Fiber: 1g
- Protein: 3g