Introduction
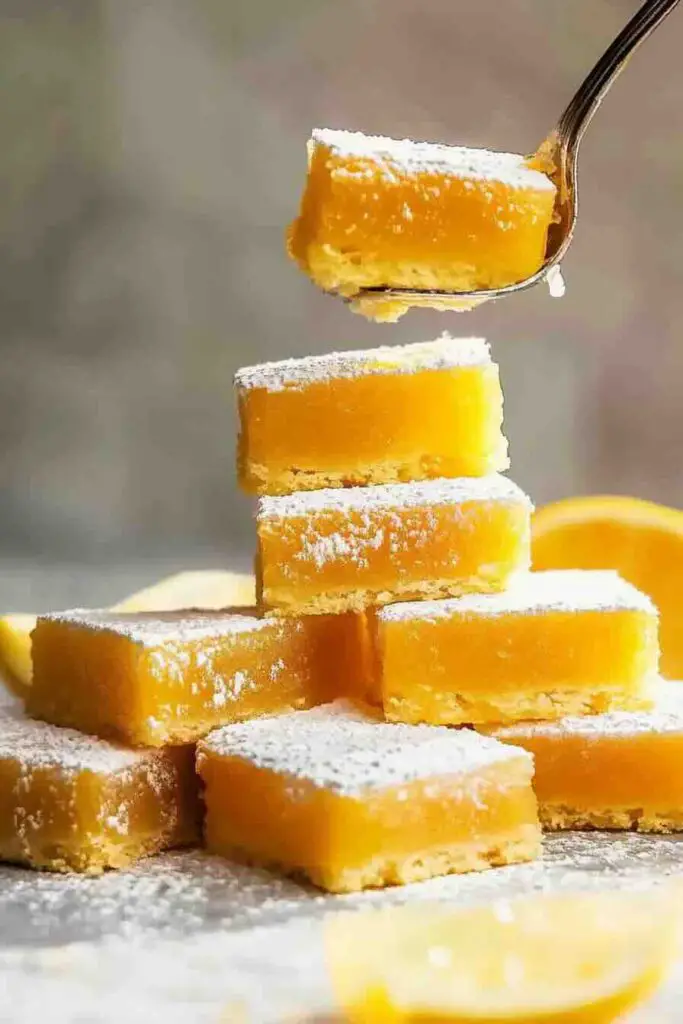
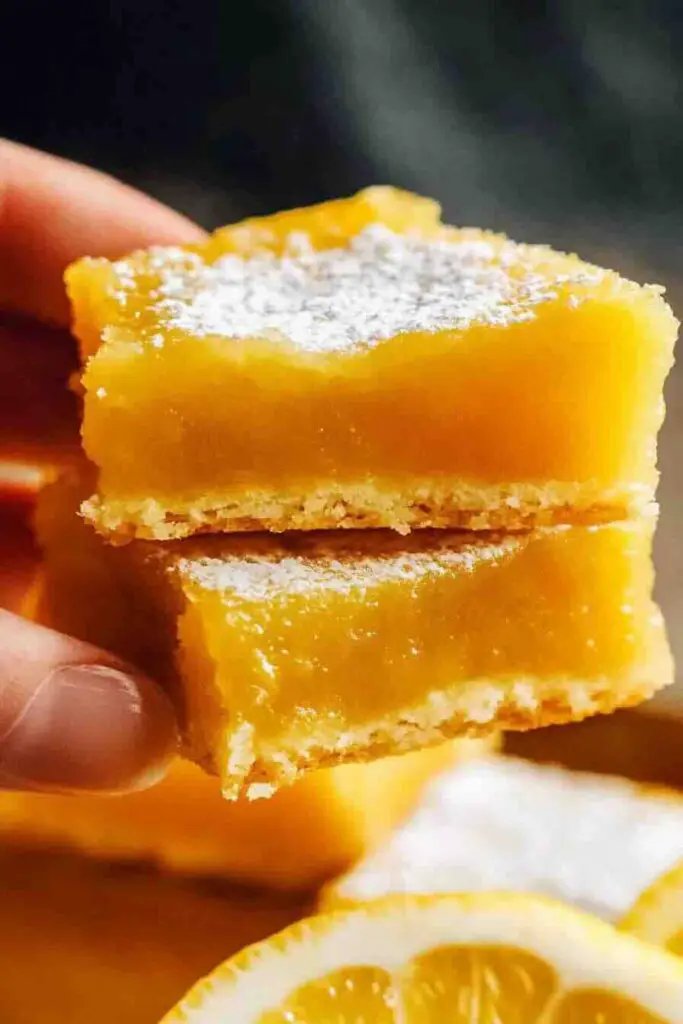
Lemon bars. Oh wow—where do I even start?! These little squares of sunshine are, hands down, one of my all-time favorite desserts. I mean, just imagine: a buttery, melt-in-your-mouth shortbread crust topped with the smoothest, tangiest, most luscious lemon curd. It’s the perfect balance of sweet and tart, with that irresistible dusting of powdered sugar on top. Ugh, SO GOOD!
If you’ve never made lemon bars before, let me tell you—this is your moment. They’re surprisingly easy, ridiculously delicious, and absolutely guaranteed to impress. Whether you’re whipping up a batch for a bake sale, a cozy tea break, or just a little self-care baking session (because you deserve it!), this recipe has got you covered.
But before we dive in, let me give you the full scoop on what makes lemon bars amazing, how to get that perfect texture, and the little tricks I swear by. Trust me, you’ll want to bookmark this one!
Reasons You’ll Love This Recipe
Oh, you need convincing? Pfft. Let me break it down:
- They’re easy to make – No fancy equipment, no complicated steps, just mix, bake, and devour.
- That flavor, though! – Buttery, crumbly shortbread meets silky, tart lemon curd. It’s a flavor explosion in the best way possible.
- Perfect for every occasion – These bars work for summer picnics, holiday treats, casual brunches, or straight-up midnight snacks (we’ve all been there).
- They store well – Bake now, enjoy all week. And yes, you can freeze them too!
What Makes a Good Lemon Bar?
Not all lemon bars are created equal. You want that perfect balance—golden, slightly crisp shortbread and a lemon curd that’s smooth, creamy, and just the right level of tart. Here’s the breakdown:
- The shortbread base – It should be firm but tender, with a melt-in-your-mouth quality. No soggy bottoms here!
- The lemon curd filling – Smooth, bright, tangy, and thick enough to hold its shape when cut.
- The right thickness – A thin crust and a thick, luscious filling is the way to go. No wimpy lemon layer allowed.
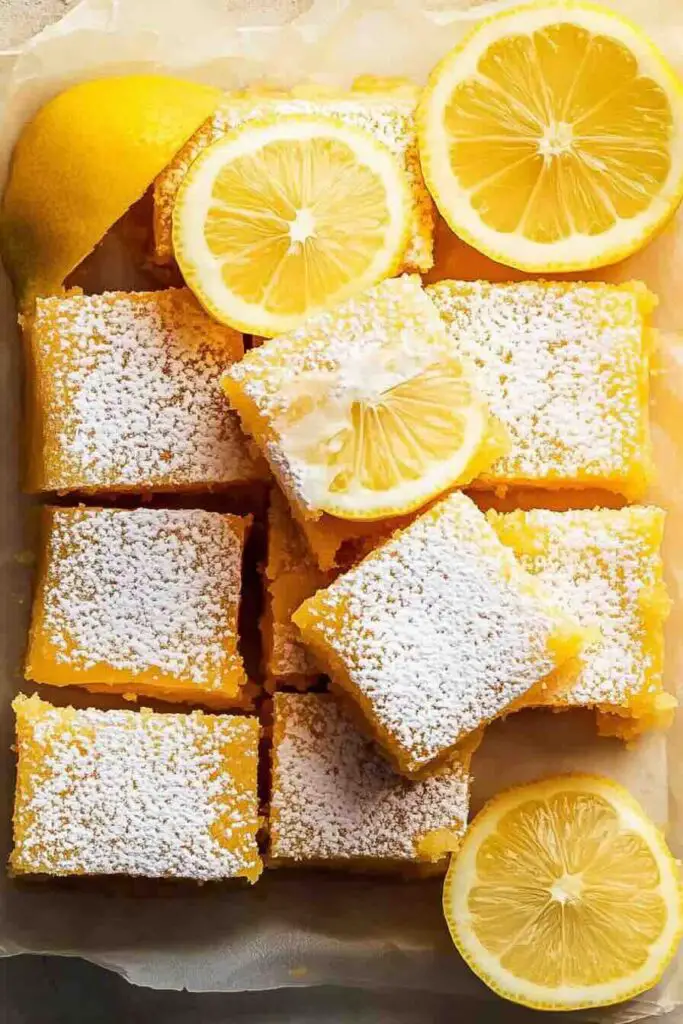
- That final dusting – Powdered sugar on top is non-negotiable. It adds the perfect touch of sweetness and makes them look fancy.
The Cultural Significance of Lemon Bars
Lemon bars are the kind of dessert that just feels nostalgic. Maybe it’s because they remind us of childhood bake sales, grandma’s kitchen, or those little moments when a sweet treat just makes everything better.
And did you know that lemon-based desserts have been loved all over the world for centuries? From British lemon curd tarts to French tarte au citron, citrus-based sweets have always been a thing. But the modern lemon bar? That’s an all-American classic, baby! These little squares of sunshine became popular in the 1960s, and they’ve never gone out of style.
A Brief History of Lemon Bars
Lemon curd, the silky magic on top of these bars, has been around for ages—we’re talking back to the 1800s in England, where it was traditionally served with scones or spread over toast. But lemon bars as we know them? That genius idea didn’t hit until the mid-20th century.
The first published lemon bar recipe appeared in a Chicago newspaper in the 1960s, and it was an instant hit. Why? Because it’s pure dessert perfection, that’s why. Fast forward to today, and you’ll find lemon bars in bakeries, coffee shops, and—hopefully—your kitchen.
Ingredients for Perfect Lemon Bars
You don’t need anything fancy for this recipe—just a handful of kitchen staples. Here’s what you’ll need:
For the Shortbread Base
- Flour – The backbone of your crust. All-purpose works best.
- Powdered sugar – Keeps the base light and tender.
- Cold butter – Because shortbread without butter is just wrong.
- A pinch of salt – Enhances the buttery goodness.
For the Lemon Curd Topping
- Eggs – They make the filling rich and creamy.
- Sugar – Balances out the tangy lemon.
- Flour – Just a little, to help the filling set properly.
- Lemon zest & juice – The real stars of the show!
Essential Equipment for Lemon Bars
- Mixing bowls – One for the crust, one for the filling.
- Whisk – For smooth, lump-free curd.
- 8-inch baking pan – The perfect size for a nice, thick layer.
- Parchment paper – So your bars lift out easily.
Step-by-Step Instructions for Making Lemon Bars
1: Make the Shortbread
- Preheat your oven to 350°F (175°C).
- Mix the flour, powdered sugar, and salt.
- Cut in the butter until the mixture resembles coarse crumbs.
- Press it into your pan and bake for 20 minutes until golden.
2: Whip Up That Lemon Curd
- Whisk together eggs, sugar, and flour until smooth.
- Add the lemon zest and juice—hello, flavor bomb!
- Pour the filling over the hot shortbread base.
3: Bake & Cool
- Pop it back in the oven for 20 minutes, until the curd is just set.
- Let it cool completely, then chill in the fridge for at least 2 hours.
How to Tell When Lemon Bars Are Done
Lemon bars can be a little tricky when it comes to knowing exactly when they’re perfectly baked. Unlike cookies or cakes, where a toothpick test usually does the trick, lemon bars require a bit more observation. Overbake them, and you’ll end up with a rubbery texture; underbake them, and you’ll have a soupy mess that refuses to set. But don’t worry—I’ve got all the tips you need to know exactly when to pull them out of the oven.
Check the Edges
One of the easiest indicators that your lemon bars are done is looking at the edges. The sides should be lightly golden brown and slightly pulling away from the pan. If the edges are still pale, the bars probably need a few more minutes. However, if they start turning deep brown, it’s a sign that they’re overbaking. The crust can become too hard, making slicing a challenge.
Observe the Center
While the edges provide one clue, the center of the bars tells the real story. You want the filling to be just set, meaning it should no longer look liquidy but also shouldn’t be rock solid. A good way to test this is by giving the pan a gentle shake—if the center barely jiggles, you’re golden! If it wobbles like a wave, give it another few minutes in the oven.
Tiny Surface Cracks Are Okay
A few minor cracks on the surface of your lemon bars are completely normal, especially if you’re baking at a slightly higher temperature. However, if you notice large, deep cracks forming, it could mean that they’ve been left in for too long, or the oven temperature is too high. Keep an eye on them in the final few minutes to ensure they don’t overbake.
Don’t Rely on Color Alone
Unlike cookies or cakes, lemon bars don’t develop a deep golden hue when they’re done baking. The filling will still look pale yellow, and that’s perfectly fine! If you’re waiting for them to darken, you might accidentally dry them out. Instead, go by texture and movement rather than color.
The Fridge Finishing Trick
Even if your lemon bars look slightly underdone when you take them out, don’t panic! Lemon curd continues to firm up as it cools, especially in the fridge. If you’re unsure, let them sit at room temperature for about 30 minutes, then transfer them to the fridge for at least two hours before slicing. This chilling time ensures they hold their shape and don’t ooze when you cut into them.
Variations & Toppings
Lemon bars are already a masterpiece on their own, but that doesn’t mean you can’t have fun experimenting with different flavors and toppings. Whether you want to add a fruity twist, a little spice, or just some extra texture, there are plenty of ways to customize your lemon bars and make them uniquely yours.
Fun Flavor Variations
- Berry Lemon Bars – Want an extra pop of color and flavor? Swirl some raspberry puree into the lemon curd before baking. You’ll get a gorgeous pink marbled effect and an added layer of fruity sweetness.
- Coconut Lemon Bars – Mix shredded coconut into the shortbread crust or sprinkle some toasted coconut on top after baking. It adds a tropical touch that pairs beautifully with the tartness of the lemon.
- Ginger Lemon Bars – If you love a bit of spice, try adding fresh grated ginger to the lemon curd. The warmth of the ginger enhances the citrusy brightness in an unexpected (but totally delicious) way.
- Lavender Lemon Bars – Infuse the sugar with dried culinary lavender before mixing it into the filling. The floral notes make these bars feel extra fancy and perfect for tea time.
- Honey Lemon Bars – Instead of regular sugar, try using honey for a naturally sweetened variation with a richer, deeper flavor.
Toppings & Garnishes
- Classic Powdered Sugar – The most traditional (and easiest) topping. A light dusting of powdered sugar right before serving makes the bars look elegant and adds a touch of sweetness.
- Lemon Zest – If you want to enhance the citrus aroma, sprinkle some freshly grated lemon zest over the bars before serving.
- Whipped Cream – A dollop of homemade whipped cream can make each bite extra creamy and indulgent.
- White Chocolate Drizzle – If you love a touch of sweetness, melt some white chocolate and drizzle it over the top for a beautiful (and tasty) finish.
- Chopped Nuts – Crushed pistachios or almonds sprinkled on top add crunch and a nutty depth of flavor.
Nutritional Insights: Are Lemon Bars Healthy?
Let’s be real—lemon bars aren’t exactly a health food. They’re buttery, sugary, and, well, absolutely delicious. But if you’re curious about what’s actually in them and how you can make them a bit healthier, let’s break it down.
Calories and Macronutrients
A standard lemon bar (about 2-inch square) contains:
- 150-200 calories
- 8-10g of fat (mostly from butter)
- 20-25g of carbs (from sugar and flour)
- 2-3g of protein
The good news? Lemon bars don’t have any artificial additives, preservatives, or mystery ingredients. They’re made from real, whole ingredients that you probably already have in your kitchen.
Healthier Ingredient Swaps
- Use whole wheat flour instead of all-purpose flour for extra fiber.
- Swap some of the sugar for honey or maple syrup to cut back on refined sugar.
- Use Greek yogurt instead of some butter in the crust for a lower-fat option.
Pro Tips & Tricks for the Best Lemon Bars
- Always use fresh lemons – Bottled lemon juice? Just no. Fresh juice and zest make all the difference.
- Bake the shortbread separately first – This keeps it crisp, so it doesn’t turn soggy under the filling.
- Chill before slicing – For the cleanest cuts, refrigerate for at least two hours before slicing.
- Line your pan with parchment paper – Makes it way easier to lift the bars out cleanly.
Storage & Health Tips
- Room Temperature Storage – Lemon bars can sit out for up to 24 hours, but beyond that, they need to be refrigerated.
- Refrigeration – Store them in an airtight container in the fridge for up to 5 days.
- Freezing – Want to save some for later? Lemon bars freeze beautifully! Wrap them individually in plastic wrap and store in a freezer bag. They’ll stay fresh for up to 2 months.
FAQs About Lemon Bars
Why are my lemon bars runny?
If your lemon bars are too soft and won’t hold their shape, they probably needed more baking time. Also, make sure you chill them before slicing!
Can I use bottled lemon juice instead of fresh?
Technically, yes. But I promise you, fresh lemon juice makes a HUGE difference. The flavor is so much brighter and fresher!
Can I make lemon bars ahead of time?
Absolutely! Lemon bars actually taste better the next day, once the flavors have had time to develop.
How do I cut lemon bars cleanly?
Use a sharp knife, wipe it clean between cuts, and chill the bars before slicing.
Before You Go…
If you loved these lemon bars, you’ll definitely want to check out my Apple Pie or Pistachio Cake next. And hey—let me know how your lemon bars turn out!
Print
Lemon Bars Recipe
- Prep Time: 15 minutes
- Cook Time: 40 minutes
- Total Time: 55 minutes
- Yield: 12–16 bars 1x
Description
These classic lemon bars feature a buttery shortbread crust topped with a tangy, sweet lemon curd filling. They’re perfect for tea time, potlucks, or a refreshing dessert any time of the year. With a crisp base and a smooth, melt-in-your-mouth lemon topping, these bars are irresistibly good and easy to make!
Ingredients
For the Shortbread Crust:
- 1 cup (226g) unsalted butter, cold and cubed
- 2 cups (240g) all-purpose flour
- 1/2 cup (60g) powdered sugar
- 1/4 teaspoon salt
For the Lemon Curd Filling:
- 4 large eggs
- 1 1/2 cups (300g) granulated sugar
- 1/4 cup (30g) all-purpose flour
- 1 tablespoon lemon zest (about 2 lemons)
- 2/3 cup (160ml) fresh lemon juice (about 3–4 lemons)
- Powdered sugar, for dusting
Instructions
Preheat & Prepare:
- Preheat your oven to 350°F (175°C).
- Line an 8×8-inch or 9×13-inch baking pan with parchment paper, leaving overhangs for easy removal.
Make the Shortbread Crust:
- In a bowl, mix flour, powdered sugar, and salt.
- Cut in cold butter using a pastry cutter or pulse in a food processor until crumbly.
- Press the mixture evenly into the prepared pan.
- Bake for 20 minutes or until light golden brown.
Prepare the Lemon Curd Filling:
- In a mixing bowl, whisk together eggs, sugar, flour, lemon zest, and fresh lemon juice until smooth.
- Pour the mixture over the hot shortbread crust.
Bake & Cool:
- Return to the oven and bake for 18-20 minutes, or until the filling is just set and no longer jiggly.
- Let the bars cool completely, then refrigerate for at least 2 hours before slicing.
Serve & Enjoy:
- Dust with powdered sugar before slicing into squares. Enjoy chilled!
Notes
- For a more intense lemon flavor: Add extra zest to the filling.
- For cleaner slices: Wipe the knife between cuts.
- Storage: Keep in an airtight container in the fridge for up to 5 days.
- Freezing: Wrap bars tightly and freeze for up to 2 months.
Nutrition
- Calories: 220
- Sugar: 22g
- Sodium: 60mg
- Fat: 9g
- Saturated Fat: 5g
- Carbohydrates: 32g
- Fiber: 0.5g
- Protein: 3g
- Cholesterol: 55mg